
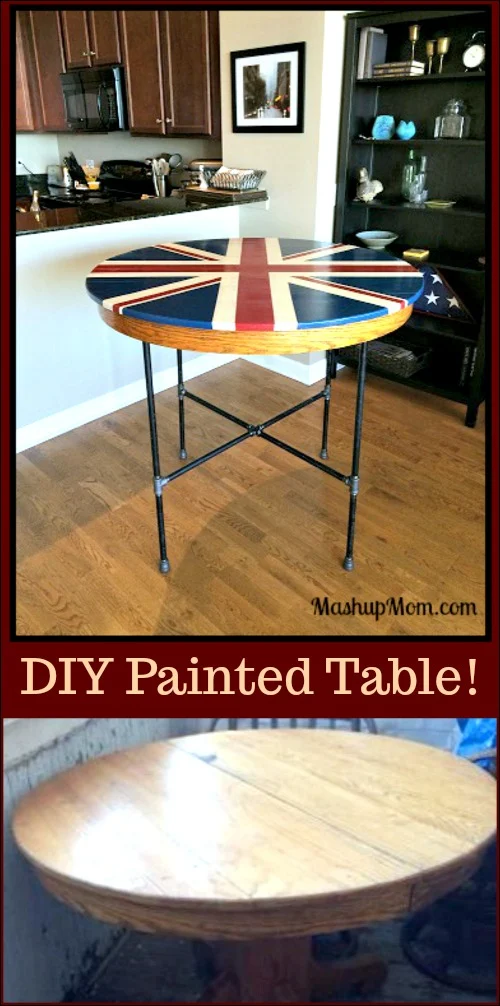
Here, Allison shares how to make a DIY painted table!
Have you ever wondered how to upscale an old garage sale furniture find, or to give your own furniture a new lease on life? Here's an easy and inexpensive way to give an old, worn out piece a completely fresh new look: How to Make a DIY Painted Table!
How to make a DIY painted table: The inspiration
Recently my family and I downsized, and my antique farm table just would not fit in our new dining area. So, I spent a couple of months looking for a bar height round table & chair set, but just couldn't find anything I loved. One night, though, I was looking though my Pinterest boards & happened upon a hand painted Union Jack crate that I had *loved* as soon as I saw it a couple years ago.
I thought to myself, "That's it -- I'll make my own table, and be done with it!"
How to make a DIY painted table: The setup
This thought led me to Craigslist, where I found this perfect-for-me round table for $15.00. Here is the table before:
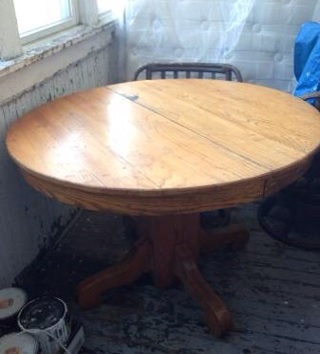
Since I needed a bar height table, I began by removing the table base. Then I used my handy dog crate as a work base because that's what I had available -- Saw horses (and a garage, lol) would be helpful, but I since we downsized no longer have either. 😉
Start by thoroughly washing your table. (If it is particularly grimy you may want to use a degreaser, or even a mild furniture refinishing product such as this Formby's conditioning furniture refinisher that I swear by.)
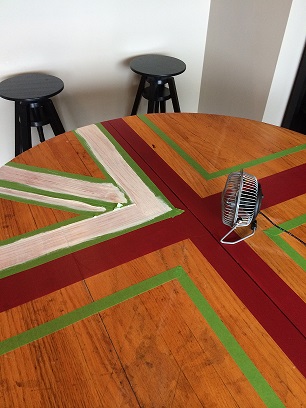
Once the table is clean, you are ready to start! I chose the Union Jack design that originally inspired me, but of course you will choose a design you love. Since I am not a great free-hand artist, a pattern like the Union Jack where I could use painter's tape to create a pattern worked best for me. (I highly recommend Frog Tape, as it's the only painter's tape I have ever used that did not bleed at all. I bought mine at JoAnn Fabrics & used a 50% off coupon, but you can also pick it up fairly affordably on Amazon.)
How to make a DIY painted table: The fun part!
First, tape off your pattern of choice on the table top. Here is mine, all taped off & ready to go:
Then, paint your table in your choice of colors! Here I used regular craft paint (which I also bought at JoAnn Fabrics). I went with these smaller containers because I knew I would never use the rest of three quarts of red, white & blue paint -- so, larger bottles of craft paint for around $2 each worked just as well.
Here is the table in progress:
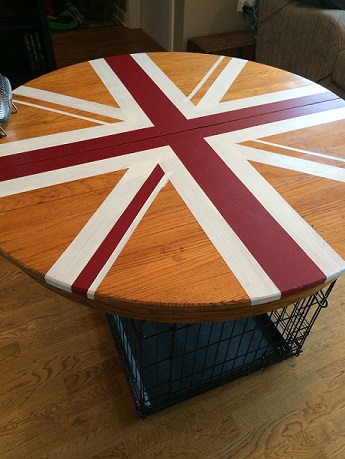
I used a little fan to speed up the drying process, but once I was done painting I also let the table dry overnight. Since this is our every day dining table, I need to be able to wash it, so once the paint was dry I gave the table three coats of Minwax Fast-Drying Polyurethane in a Clear Semi-Gloss finish. (I bought a tiny 8 oz can at Home Depot for about $4.00 and still have more than half left for another project, but you can generally pick up a quart for about $10 if you are doing a larger project or coating multiple items.)
I let the Minwax dry for about a week, but overnight should really be sufficient. (I waited because I needed my husband for the next part, and the following weekend was when we had time to assemble the base!) This step is optional, because you may be using your current table that already has legs -- or maybe you found a table you like that is the right height for you.
How to make a DIY painted table: The legs are optional
The table I found on Craigslist was standard table height, so since I wanted bar height, I had to give it new legs.
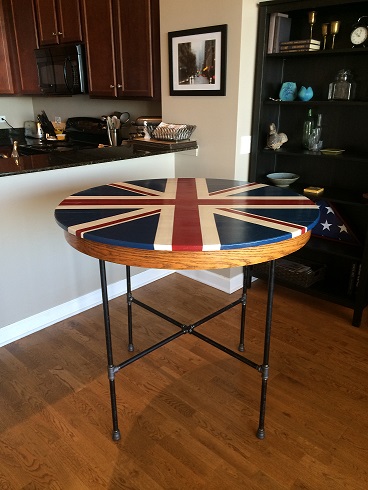
Here I was going for an industrial look to coordinate with the sofa table my husband made for our living room about a year ago. Our dining area flows into our living room, so because the two tables are somewhat near each other I wanted them to coordinate. To accomplish this look we chose black pipe for the legs.
If you are interested in a similar industrial look, there are several different styles you could go with. Look at Pinterest & search "pipe table" for inspiration and plenty of options to choose from. For my painted table, I chose four legs connected in the center with an X shape that also acts as a foot rest. (We used our bar height patio table as a guide for measurements, but you can size it to fit your own family's needs.)
You can find some easy to follow instructions for connecting these types of pipes on the Lowe's website; take a look and you'll see that it is pretty easy to wing it and get the look you're going for. (Had I realized how easy it was to assemble the pipe pieces, I probably wouldn't have waited for my husband to do it!)
The pipe cost us about $100 at Home Depot, and they cut every piece to size. We then assembled the legs, screwing them into the table top using floor flanges, which allowed us to level the table as we went because the flanges are threaded. Since we have wood floors, I also bought some furniture slides at Home Depot and glued them to the bottom of each leg so that the table won't damage our floors when it is moved around.
How to make a DIY painted table: The cost breakdown
Material Costs:
Table $15
Paint $6
Polyurethane $4
Frog Tape $4
Pipe $100
Screws $5
If you are using your own table and don't need pipe for the legs, you can make your own DIY painted table for the cost of paint, tape, and polyurethane (likely less than $15!).
My total for the whole project shown here was about $140.00, which isn't bad for a "new" custom table that we will use every day.
Vanessa
Thursday 4th of December 2014
This is awesome. Great idea and great way to recycle a table top. I love it. Stopping by from Thrifty Thursday Link party.
Outlander
Thursday 4th of December 2014
Looks awesome!! What did you do with your old farm table? And what kind of chairs did you put with this table?
allison
Thursday 4th of December 2014
Thanks! I gave the farm table to my daughter for her apartment, so at least we still have it. Right now I have small swivel stools I bought at Ikea, but I am not sure I like them. They were ok for our countertop/bar eating area, but they look kind of off with the table. I would like to get stools with backs, maybe in a dark brown leather-type material, but that won't be until after the holidays. ;)
Marybeth
Wednesday 3rd of December 2014
Well you certainly have inspired me. Your table looks great, very nice job!
Tina
Wednesday 3rd of December 2014
I love it! Great job.
Allison
Wednesday 3rd of December 2014
Thank you both! This was a pretty easy project. Definitely doable in a couple days. :)