
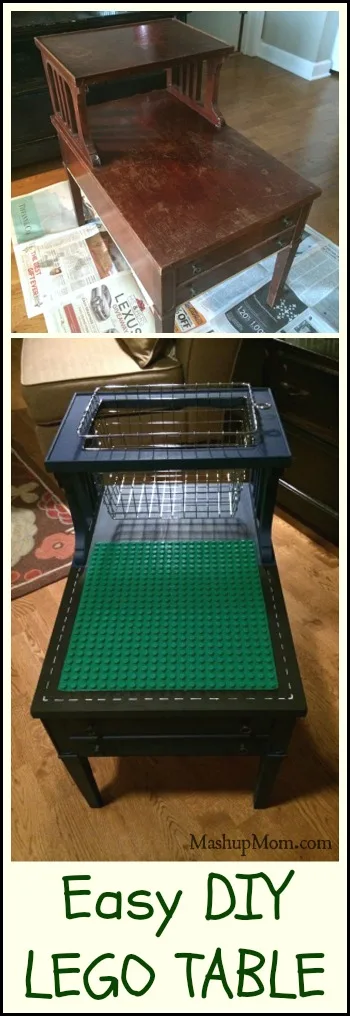
This week’s Frugal Homemade feature is: How to make an easy DIY LEGO Table! (Or, DUPLO Table, depending on the age of your little one...)
A meaningful handmade DIY gift
I was thinking about what I could give my nephew for Christmas this year. He’s only 15 months old, and I thought it would be nice to give him something he can grow into. So I found some inspiration on Pinterest, and knew that this DIY LEGO table would be easy to make as long as I could find the right table. (You might get lucky & find one in your Great Aunt Sophie’s basement or at a garage sale, but I found mine on Craigslist.)
Materials for your DIY LEGO Table
What you will need
An end table (mine was $15.00)
A LEGO or a DUPLO baseplate. I bought mine on Amazon for around $15.00
A basket to hold the LEGOs. I also bought this from Amazon, for $13.00
Some LEGOs or DUPLO blocks. I went with a cute starter DUPLO farm animal set for $8, again from Amazon
FolkArt Home Decor Chalk paint, 1 bottle, purchased on sale at JoAnn for $5.99
MixWax Fast Drying Polyurethane, available at Home Depot for around $4. The 8oz small can is plenty.
Paint brushes
Strong glue -- I use Gorilla Glue for projects like this
Optional
Black craft paint, under $1 at JoAnn
White craft paint (under $1 at JoAnn) or a white paint pen, around $3 at JoAnn
Ruler
Scrapbooking paper, under $1 at JoAnn
ModPodge, about $4 (or make your own with white school glue and water)
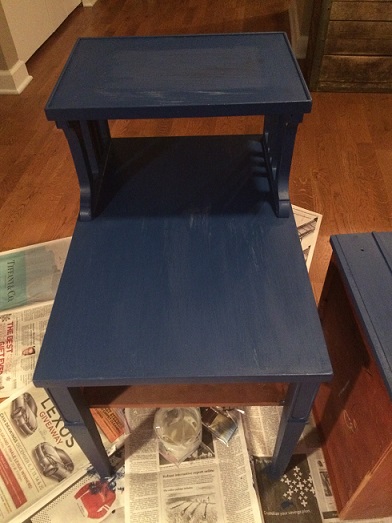
I asked my sister-in-law what color she would like the table to be for my nephew’s room & she chose blue, so I went with the color "Nautical." It’s a nice medium blue, not too bright & not at all “baby blue."

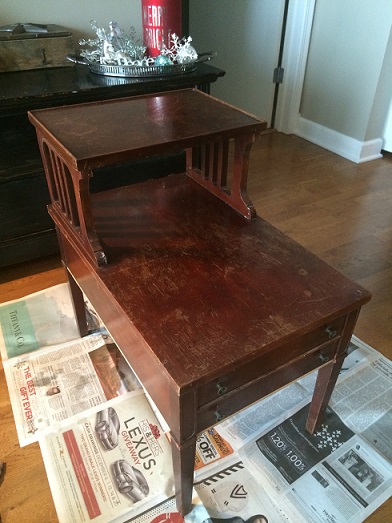
Here is the table I started with. As you can see, it is not in great shape! But that is OK, because that is what paint is for. 🙂

DIY LEGO Table: Step-by-Step Directions
I started by washing the table and then giving it a quick base coat of chalk paint. After the initial coat dried, I gave it one more coat, which covered nicely & turned out to be the final coat.
After letting the paint dry for a few hours, I decided to add a roadway around the edge of the table. Here, I used black craft paint & painted the side & front edges of the table top, so the base plate would cover the inner edge of the paint.
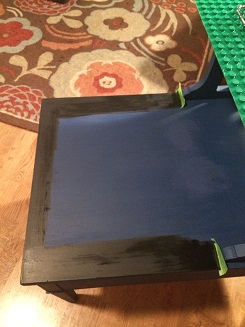
Once the black paint dried, I just used a ruler & my white paint pen to make the lines on the road.
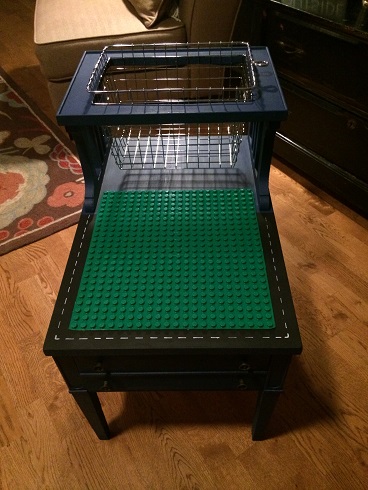
After the road was completely dry, I gave the whole table one coat of MinWax Polyurethane. The base plate is 15″ x 15″, which was a tiny bit too big to fit my table. After a moment of panic, though, I realized that the plastic was thin enough to simply cut to size with scissors. Whew!
I then used Gorilla Glue to attach a DUPLO base plate to the table top. Keep in mind that Gorilla Glue tends to expand & seep a bit when it dries, so I only applied it to about a 10″ square in the middle of the base plate. (Plus, I want to be able to pop the DUPLO plate off when my nephew advances to regular LEGOs, so I can easily replace it with the LEGO base plate in a few years!) I set a few books on top of the base plate & let that dry over night.

Since I ordered my basket from Amazon, it wasn’t here yet when I started this project, so I would actually recommend cutting out the hole for the basket first & then painting. I used a jigsaw to cut the top of the table out ¼″ smaller than the diameter of my basket. If you’re new to using a jigsaw, here is a nice video tutorial that will show you how to use holes to cut the perfect pocket cut. You can see here that I drew a dotted line to follow with the jig saw & just inside the cut line I drilled a hole large enough for the saw blade to fit in.

The basket I used is slightly tapered, so cutting the hole slightly smaller allows the basket to “sit” on the edge of the hole. After that, I sanded the cut, touched up the paint, painted the inside of the cut & applied another polyurethane coat to the freshly painted area.
Pop in your basket, fill it with DUPLO pieces or LEGOs, & you’re all set!
Note: The particular basket I used is great for DUPLO, but not so much for LEGO! If you're making a LEGO rather than a DUPLO table, you’ll need a woven basket or one with a liner. I will just make a liner for this basket when my nephew advances to LEGOs.
Notes:
- I thought it would be cute to use LEGOs as drawer pulls on the drawer, but didn’t have any regular LEGOs handy. You could easily swap out the knobs on your table (if it has a drawer) and Gorilla Glue LEGOs in place of the knobs.
- If you can’t find a table like the one I used, you can use any table you’d like. I’ve even seen old dresser drawers converted into rolling under-bed LEGO stations, which is also a great idea!
- My table has a drawer, and since it is old, the drawer isn’t very pretty on the inside. I glued scrapbooking paper to the bottom of the drawer and then ModPodged it in place. (You can make your own ModPodge by mixing equal parts of white school glue & water.) Brush a thin layer on the paper & allow to dry. This gives the paper a more durable finish.
- Kari O. commented below that a regular LEGO base plate will accommodate the larger sized DUPLO LEGOs, so you could save yourself some money by just using the LEGO plate in the first place!
Happy DIYing!
Stay tuned...
Up next week in Frugal Homemade: The Easiest, Best Tasting Cinnamon Rolls You’ll Ever Make — perfect for busy weekend mornings!
More Frugal Homemade Ideas
If you’re looking for more "frugal homemade" ideas, read more in these categories:
Anything else you’d like to see covered in these posts? Comment here!