Welcome to Frugal Homemade! This week, with all of the school supplies deals, I am featuring a way to make use of something that many of us have lying around.
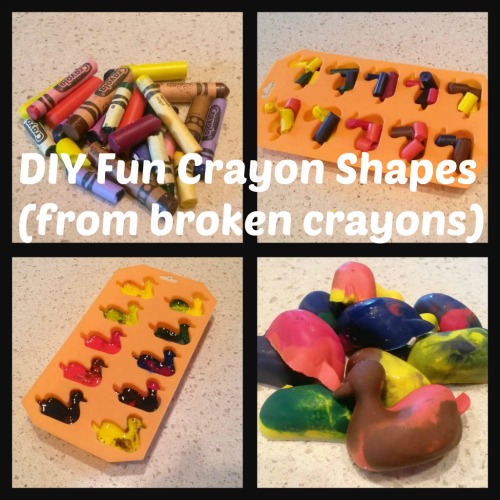
Gather those broken crayons you've been wanting to throw away. Or better yet, tell the individual responsible for breaking said crayons to collect them!
This also can be an inexpensive way to make toddler-friendly crayons from the cheap ordinary crayons and avoid paying a premium for products designed for smaller hands. Conveniently, this week is a great one for picking up cheap crayons. For instance:
- Big Lots: 24 ct, $.45.
- Kmart: Crayola 24 ct, $.25 each with $5.00 minimum purchase limit five.
- Meijer: Crayola 24 ct, $.50 limit 10.
- Office Max/Office Depot: Crayola 24 ct, $.50 limit 3.
- Target: up & up 24 ct, $.39 and FREE with the $1.00/2 up & up school supplies mobile coupon (text OFFERS to 827438); Crayola 24 ct, $.50.
- Walgreens: Crayola 24 ct, $.49 limit 4.
- Walmart: Crayola 24 ct, $.49.
You will need something heat-save to put them in for reshaping. Molds (sometimes labeled as ice trays) can be found in craft stores, random places in grocery stores, etc. I am using a duckie mold I threw on to an Amazon order a while back. I think a fish one like this (add-on item, under $5) would also be a perfect shape for crayons. It is probably wise to designate whatever you decide to use as non-food use only as it might get stained and the crayon residue can be stubborn.
Preheat your oven to 250°. Peel the paper.

You may even find an eager helper, excited to think her crayons will soon be duckie-shaped.

Sort out your crayon pieces. You can be totally haphazard or you can try to mix colors intentionally. Or you can really keep it simple and just make single-color crayons. Fill your mold with crayon pieces. Make sure you fill them as much as you can, as things will settle once it all starts melting. You don't want any part of the crayon to be too thin or it will just break again that much faster.
Place the tray in the oven for 10-15 minutes, until liquified. Check frequently after ten minutes, because it won't take long once it gets going. Remove the tray carefully from the oven and let it cool for ten minutes or so at room temperature. Once it is cool to the touch, you can put it in the fridge or freezer to speed up the process.
Let the tray come back to room temperature and carefully pop your new fun crayons out. They are ready to use!
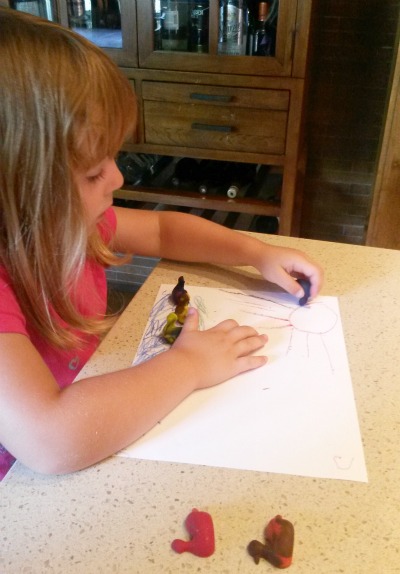
Now they are not only crayons, but also figurines ready to be added to a scene!
![]()
![]()
Be sure to check back each week for something new! I will be bringing you how-tos, advice, and articles on everything pertaining to easy frugal living: From DIY, to recipes, to practical tips and tricks. To help balance out the couponing and deal chasing we do a lot of here, I’ll talk about easy ways to incorporate frugality into everyday life and to do more from scratch.
Cindy
Friday 8th of August 2014
I have several cookie sheet type molds that I picked up on clearance after the holidays that I use for this. I have a Christmas one that we used for my son's class party and each kid got to take home their own set of Christmas shaped crayons. I also have one with different hearts that we have used to make crayons to go with our Valentines.
melissa
Friday 8th of August 2014
ive done this before! i had a terrible time with the cheap off brand crayons. the color seperated from the wax and settled at the bottom of the mold. they also came out chalky. crayola works best for this project!
Susan C.
Friday 8th of August 2014
Great idea! When my kids were young I would grate the crayons and let them put the 'shavings' how they liked on a piece of wax paper. Then I would put another piece of wax paper on top, place between sheets of newspaper and iron on low. Instant personalized place mats.